Saturday, February 27, 2010

Tsunami and Prayers

It has been a stressful morning. Please PRAY for my cousins Courtney and Kelsey and everyone else in Hawaii who are now being evacuated due to the tsunami that will hit later this afternoon. Heavenly Father, please protect them.

On a positive side note...The baby shower was a success and the dress was a huge hit! I even had people request that I be at their baby showers too. That made me feel pretty good. 

Tuesday, February 23, 2010

Baby Booties too!


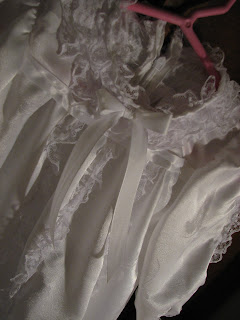
I just can't stop looking at the baby blessing gown I made the other day! I am seriously in love! And for some reason I felt like I was missing something. I'd walk in my craft room and back out again over and over looking for something. I didn't know what it was til now. The dress needed some booties to match. So I got to work! And once I got started I couldn't stop. I think these might also be something I'd consider putting up in my Etsy Shop (which I am still thinking about).

Oh and isn't the lighting perfect on these photos? This morning was great for pictures.
Don't these make a cute pair? I can't wait for the baby shower this weekend!

Sunday, February 21, 2010

Bunk Bed Progress

 
 Just wanted to show the progress we've make in our bunk bed project. We have completed both head-boards and foot-boards, have built the mattress frames, ladder, and side rail. All the pieces have been puttied and are now dry. Now it's just sanding and paint! We are getting there! I don't have pictures of the ladder or side rail yet but you'll see them when they are painted. Here's a picture of one of the mattress frames.

In a Sunday Afternoon


Today was a lovely Sunday. I spent the morning at church and then this afternoon during the kid's nap, I enjoyed the quiet in my craft room working on this sweet little dress. The sun was bright outside and there wasn't a cloud in the sky. It was beautiful!

Speaking of  beautiful...I am so pleased with how this dress turned out. I am absolutely in love! It is actually made from an old dress of mine that kept tearing and was no longer fixable.

This little white blessing dress is a gift for a friend's baby shower this weekend. I soo can't wait for her to open it!

I am also playing with the idea of starting up an etsy shop selling these little dresses. How much would you pay for something like this?


A Craft A Day

Friday, February 19, 2010

Oak Poster Frame


I don't think I ever got around to showing you all the picture frame I made to go along with the orange bankable bookshelf that we built. It is now hanging proudly in the kid's room. And yes I know it is crooked. I did that on purpose. I made it all myself too!
I ripped some oak boards on the table saw (which was pretty scary BTW). Then I screwed the corners together with some countersunk screws. We have a really nifty tool too. It is a frame clamp. It holds the wood at a perfect 90 degree angle while you fasten the boards together. It worked great. I then puttied over the screws, sanded and did a light coat of the orange paint to give it more of a orange stain look. I love it! The poster is actually hung with some sticky tack and the frame is sitting on top of it hanging from some sawtooth hooks. Now it is easy peasy to switch out the poster if need be.

And here is the bookshelf all filled up with toys and books. Although it probably doesn't look like this anymore. The toys are now on the floor. Now if I could get the kids to stop using the shelf as a ladder...!

The bunk-beds are in the works right now. They look amazing so far! The footboards and head boards are all put together. The mattress frames are assembled and we are now working on the ladder and side rails. I can't wait to paint it. I was originally going to go with sort of an aqua greenish color but was outvoted. It's gonna be a darker red! Orange and red go with Woody and Buzz don't they?

Tuesday, February 16, 2010

Imagine Children's Museum

So it is taking me a couple posts to get caught up on the fun birthday weekend we has this past weekend. It was fun to have Grandma and Grandpa Glenn here to celebrate with us. On Friday afternoon the six of us when to the Imagine Children's Museum in Everett, WA. We've been before and I think we had more fun the second time around. That's probably because the last time we went Ethan wasn't even walking yet.

I took lots of pictures while we were there. I love going to children museums not only because they're fun, but because there are so many fun ideas for future decorating projects! But those will have to wait.
 
One of the first room the kids found was the animal hospital. Ethan enjoyed taking the animals out of their cages and giving them baths in the clinic's wash tub. He even made the sound effects of the water. After giving each of the animals a bath he'd give them a bowl of food. He also made the eating sounds. It was cute to watch. Kiera liked playing the veterinarian and listened for the heart beats and wanted the animals to "feel better."


And what boy doesn't love trains? Ethan and Grandpa spent a long long time at the train track. It was a new addition from the last time we were there. It was a hit. 
It was a lot of fun! There was so much to do and explore! Here are some of my favorite pictures from the trip.  Thanks Grandma and Grandpa for taking us!


And thanks Ethan for having a birthday so we could celebrate with you!

Monday, February 15, 2010

My baby is TWO!!!


I can't believe my baby is two today! Time has gone by so so so fast. We celebrated his birthday this past weekend with Grandma and Grandpa Glenn in town and some of the cousins. I will post more pictures soon but I wanted to share this video of him blowing out his candles! It was so cute to watch him keep trying over and over again.

Thursday, February 11, 2010

My Boy is Growing Up So Fast!

Where has the time gone? Can my little boy be turning 2 already? He has grown so fast! I made a cake for his birthday party this weekend. He's gonna love it!
 

Here's a close-up
It was really easy to do too. I just made two 9x13 cakes, stacked them on top of each other, and cut it into the shape of a "2". Then I made some buttercream icing from scratch (the best!) and used a hint of coconut extract for some extra flavor. The toy cars are just some of his recent favorites (and yes I washed them first), and the stop sign is just red cardstock and a toothpick. Way cute!

Craft Room Peg Board


I have the bestest husband in the world! He does things for me just to make me happy. We have been working on a lot of different projects lately. After just finishing the bankable bookshelf we built a poster frame for the Toy Story poster the kid's got for Christmas, started work on the bunk beds (post on that coming soon), worked on a little something we have planned for Christmas (yes we are starting early), and lastly my craft room peg board!

I love love love how it turned out! Dan picked up a sheet of white peg board at our favorite toy store (Home Depot). We used the entire sheet; it was the perfect fit for the space we had planned. Then we took some left over oak that Dan had inherited from a friend and ripped it on the table saw to make a skinny frame around it. We then ran it through the table saw again a couple times with the blade set around 1/2 inch to make a slot for the peg board to slide into and then routered the edges. To finish we screwed the frame together at the corners on the back. I had originally planned on painting the frame black but it looked good the way it was, and the color matches the door frame. Yea!

I got a set of hooks at WalMart for really cheap. All the hooks you see cost me only $8. Not bad. I love that I can put my own set of tools up and not have to scrounge around in the garage anymore! Doesn't it look great? I've put more up since but couldn't wait to show you.
Did you notice the funnest part? The light switch even has its own frame and is now part of the pegboard! How cool is that? Thank you honey! You're the best!

Here's a preview of our next project...

Friday, February 5, 2010

Bankable Bookshelves Update

Alright everyone. The bookshelf is looking great. I am soooo excited for it to go in the kid's room!And as you can see, I decided on the orange. We are renting right now so I decided it would be easier to add color to the furniture instead of painting the walls; which we'd have to paint back to boring old white when we move. I took a couple pictures of it while the last coat of paint was drying this afternoon. I will let it sit overnight just to be sure it is completely dry and then it's off to the kid's room. Ooooh I can't wait!
I told Kiera today that it was going in her room and she got so excited. It made it all the more worth the effort! Just wait til she sees the new poster picture frame I made to match!

Tuesday, February 2, 2010

The Incredible Shrinkables

No this is not a craft post. Althought the name The Incredible Shrinkables does remind me of the Shrinky Dinks I did when I was little. Instead, I am working on a new kind of project. A self-improvement project.
In January I joined up with a few of my friends from church to be in Marysville's "Be A Loser" competition. Our team name is "The Incredible Shrinkables."


We have until June to strut our stuff and motivate each other to keep on exercising and lose some weight. So far I have lost a little over 5 lbs! So here we go! Wish us luck.

Bankable Bookshelves in the Works.

Our most recent project has been some bankable bookshelves for the kid's room. It is our attempt to organize the chaos that has occurred since Christmas.

We got the plans from knock off wood. If you haven't checked out her blog yet you should! It is soooo much fun! I will caution you first. You'll be addicted, and your future project list will grow VERY fast!

Last night Dan and I worked in the garage after I got back from the gym (I'm currently in a Biggest Loser competition put on by my city. But that is another post for another day). We worked in there until about 11:45 p.m. We always loose track of time when we are working on wood projects. I love it! I also love the fact that I get to work side by side with my wonderful husband. This is as far as we got.

I love how you can go from this...

To this...

Today I puttied the screw holes, and am just waiting for it to dry. Later tonight I plan on sanding and painting. I haven't quite yet decided what color to paint it yet. I am thinking either white or a light tangerine orange. I plan on getting some multicolored fabric boxes to put toys in too. What do you think?